Before you start
- AWS account with permission to use Amazon Cognito in your chosen Region (for example
eu-central-1). - WoodsPortal administrator access (Integration Manager).
- A decision on callback (redirect) URLs: use the exact HTTPS URLs WoodsPortal expects for OAuth/OIDC (your onboarding doc, support, or the integration View Details screen may list them). Add the same URLs in Cognito for the app client.
Security: Treat the client secret like a password. Do not paste it into chat, tickets, or public repos. Rotate it if it is exposed.
1. Create or open a Cognito user pool
- In the AWS Management Console, open Amazon Cognito → User pools.
- Either create a new pool or open an existing one.
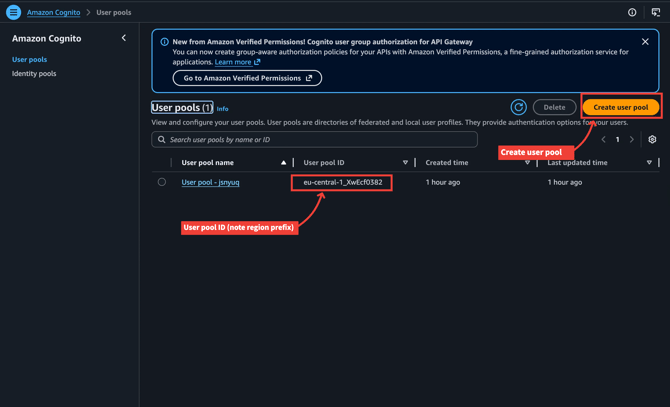
eu-central-1_XwEcf0382). The segment before the underscore is your Region.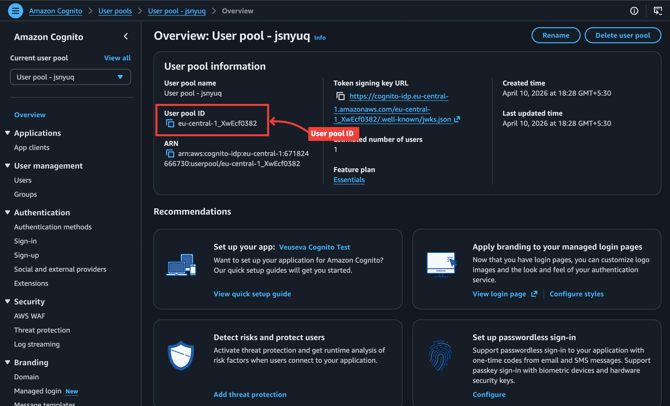
2. Configure a Cognito hosted UI domain
WoodsPortal needs the hosted UI domain for your user pool (the URL users see when Cognito handles sign-in).
- In the left menu, under Branding, open Domain.
- Under Cognito domain, ensure a domain prefix is set. The full URL looks like
https://<prefix>.auth.<region>.amazoncognito.com.
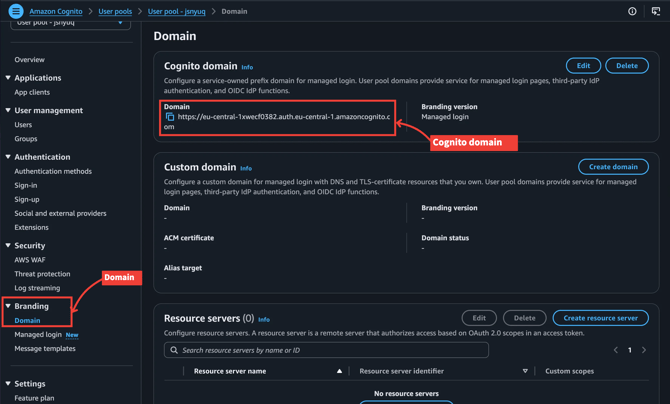
WoodsPortal field “Cognito Domain”: Enter the value your product expects—often the host only (no https://), for example
<prefix>.auth.<region>.amazoncognito.com. If connection fails, try the prefix only form if your admin UI documents that variant.
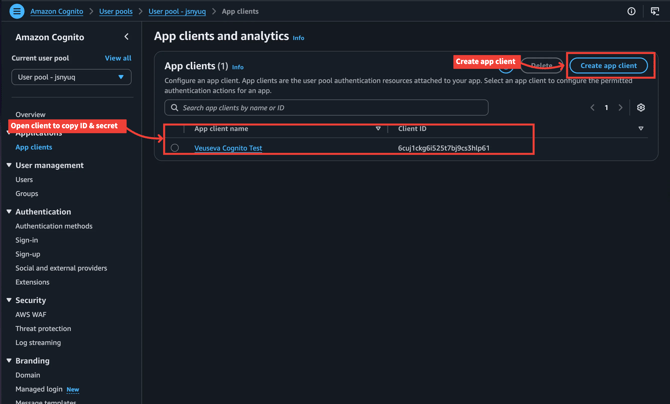
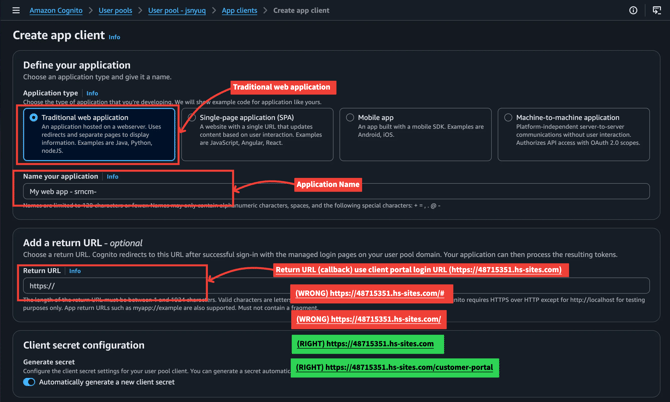
3. Create an app client (confidential / with secret)
- In the left menu, open Applications → App clients.
- Choose Create app client.
-
- Set Application type to Traditional web application (or equivalent for a server-side / confidential client that can keep a client secret).
- Set Return URL (allowed callback URL) to the WoodsPortal-provided redirect URL(s). You can add more callback and sign-out URLs later under the client’s Login pages / hosted UI settings if the console moves them there.
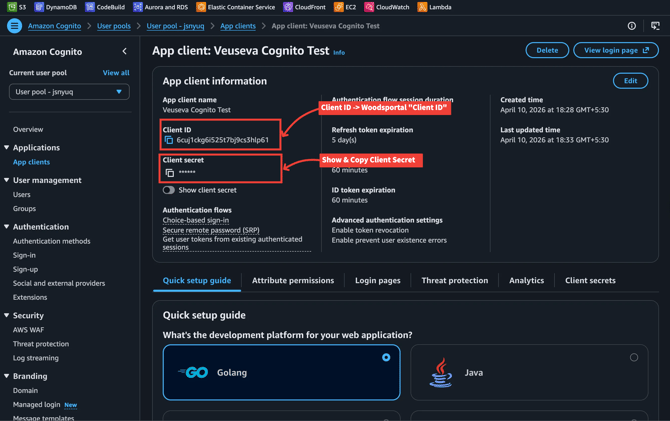
5. Finish creating the client, open it, then copy:
-
- Client ID
- Client secret (use Show client secret only when copying; store it securely)

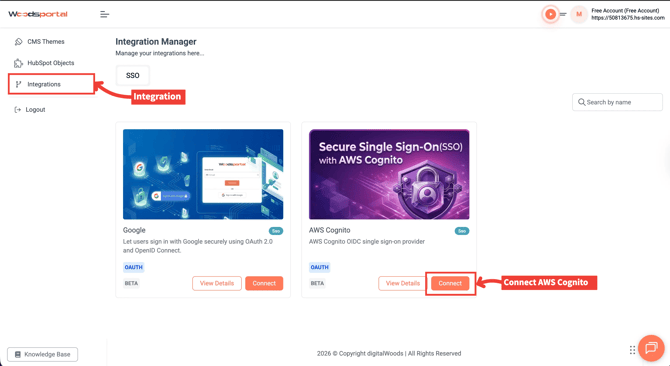
openid, and add email , profile if your pool and WoodsPortal expect them.4. Connect Cognito in WoodsPortal
- Sign in to WoodsPortal as an admin and open Integrations in the sidebar.
- Under SSO, find AWS Cognito and click Connect.
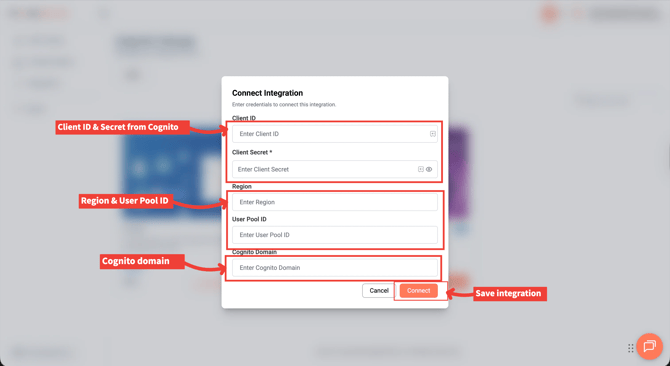
| WoodsPortal field | Where to find it in AWS |
|---|---|
| Client ID | App client → Client ID |
| Client Secret | App client → show/copy secret |
| Region | Region where the user pool lives (e.g. eu-central-1) |
| User Pool ID | User pool overview → User pool ID |
| Cognito Domain | Branding → Domain → Cognito domain (see section 2) |
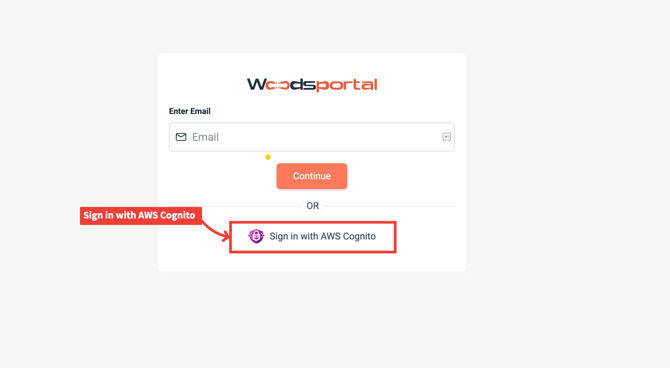
5. End-user sign-in
After the integration is saved, the WoodsPortal login page shows Sign in with AWS Cognito. Users who should use SSO click that button and complete Cognito sign-in.
Troubleshooting
| Symptom | Things to check |
|---|---|
Redirect error / redirect_mismatch |
Callback URL in Cognito exactly matches WoodsPortal (scheme, host, path, no trailing slash mismatch). |
| Invalid client / auth errors | Client ID and secret copied correctly; client still exists; secret not rotated without updating WoodsPortal. |
| Wrong region errors | Region matches the user pool (same as in the User pool ID prefix). |
| Domain errors | Cognito Domain format matches what WoodsPortal expects (with or without https://, host vs prefix—see section 2). |
| Missing email/name claims | App client attribute permissions and OpenID scopes (email, profile) in Cognito.From the woodsportal workspace root (parent repo), with a local venv that has Pillow:Otput: docs/aws-cognito-sso/images/annotated/*.png.Files in this folderScreenshots in images/original/ are examples; your pool names, IDs, and URLs will differ. |